Saturday, July 10, 2010

How to: Define your eyebrows

Before ^
After ^

Not a regularly discussed subject but I really think that this is important, it can really enhance your look or just change it up every once in a while if that's what you would rather. I once heard a saying (from a different beauty vlogger) that if your eyes are the picture, then your eyebrows are the frame.

Start off by using an eyelash brush just to brush out your brows. Now use some coloured pencil or powder that will darken your brows. I use an eyebrow pencil from MAC called impeccable brow pencil in "taupe" do just short strokes along your natural brow so where the hair is. Once you get better at it you can create an arch even though you may not have one. I suggest starting off realy lightly and then once you get more comfortable try to make them darker until you find a style that you like. Now you seal the look with brow gel, I use clear mascara which works just as well but there are coloured brow gels out there, I just haven't used it before. Apply it at the bottom of the brow closest to your face then wiggle the wand upwards, you don't need to use much. Brush it all along the rest of the brow with an eyelash and you should be set!

Try it out!

PLH,
kmatheson

Friday, July 9, 2010

Basic Bronzer

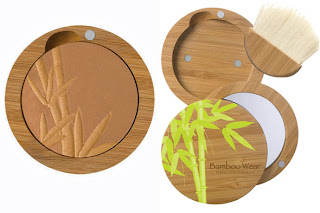
As summer is coming on full blast I'm finding that blush is becoming less of a daily staple in my routine and bronzer is better. I used to use Bare Minerals "warmth" but it's super dark and doesn't have much dimension to it, so I switched over to Physician's Formula Bronzer in Bamboo Wear. I really like that one, it's nice and shimmery and isn't too dark but that brush that comes with it is bad, it sheds everywhere so be forewarned! Don't be too afraid to try a slightly darker shade than what you would go for because you can always apply it very softly, I find that light bronzers don't really do much.
Start off by applying the bronzer to the apples of your cheeks spreading up towards your temples. If you don't like that look and like more of a contour; go just below your apples and apply upwards. This part you want it just a hint darker then the rest of your application.
After that, sweep it across your forehead, down your nose, along your chin and the rest of your cheeks. This part of the application is lighter, it's mostly meant to blend the colour out and so your cheeks aren't so stark, I woudn't even put more bronzer on the brush after you've done your cheeks. One must is to make sure you blend your bronzer in your neck! This creates a more seamless look and doesn't make it so obvious that you're wearing bronzer.

If you don't like a shimmery bronzer I suggest using Benefit's Hoola Bronzer, I haven't actually tried that one out but I've heard that it's a really good matte bronzer.
Enjoy!


PLH,
kmatheson

Wednesday, July 7, 2010

Review: OPI's "What's with the Cattitude?"

I believe that I mentioned before how much I wanted this colour. I had been hearing reviews about it for months and months and I started obsessing over where I could find it. I tried every store that sold OPI, I tried to order it online (only to find stores that wouldn't ship to Canada) when finally my mom bought it for me and shipped to me. That's how much this obsession took over my life (ahaha). (sorry for the non-white background btw :( I'll get it back soon). This colour is actually part of the Shrek collection that OPI had launched earlier this year, which I suppose this one is meant to be inspired by Puss in Boots. OPI describes it as "a moody blue that's really a pussycat.", it's a little cheesy but I love the name, I love everything about this colour. This bottle applies pretty well and only takes about 2-3 coats. One thing that was a wee bit annoying was that it chipped pretty easily :( but that could be due to that fact that my nails were quite long this week and I wasn't taking great care of them (during my trip and what not) so I wouldn't necessarily blame that on the polish, more just on my carelessness. It did bubble a wee bit but not enough to get really annoyed over. I have to say that this is definitely one of my top favourites, I always love blue nail polish but I always find that the hue is a little off, this one was just perfect, love it love it love it. :)
100% a total 10/10

PLH,
kmatheson

Sunday, July 4, 2010

A Blessing in Disguise

As I had mentioned in my last post, the newest cleanser that I had used really did heavy damage to my face. Seriously, one of the worst breakouts I think I have ever experienced in my life! But this did lead to one nice discovery, I was super desperate to find anything that would cover up my hideous blemishes I had read/heard about using eye drops to cover up any redness but every other time I was too nervous to try it, but this called for desperate measures. I bought the cheapest brand of eye drops called "clear eyes" in the one that just read 'reduces redness' after all I wasn't treating allergies or anything. What I did was just put a few drops on a q-tip and then dabbed into the problem spot. I applied it pretty liberally because as I said before I was super desperate. I put the drops on after my moisturizer and before my concealer, then just wait for it to dry before applying your foundation. I have to say that these eye drops really does do wonders! I was so impressed! It takes away the redness but also dries out the blemish, so this almost cures it and gets rid of it faster then if you had just left it with makeup. This seriously saved my life, one of the best beauty tips I think that I have ever tried and I have really sensitive skin so it was really amazing that it worked. Definitely try it if you are ever in the same situation as I was!


Hopefully this is helpful! :D

PLH,
kmatheson

Thursday, July 1, 2010

Review: L'oreal's 360 Go Clean Cleanser

Sorry for the lack of posts lately, I've been in Ireland and haven't had much access to the internet, so the posts for a while are going to be a little irregular until I get home. :)

I got this cleanser as a gift from someone so I kept it around until I ran out of my regular one. I was super skeptical about trying this just because my skin is so sensitive and it doesn't end too well when I decide to switch things up. After about a week this cleanser seemed alright meaning I didn't have any breakouts and I didn't really notice any difference. The cleanser does sting a bit (I used the cream cleanser) and one time I got it stuck up my nose (ahahha) and it really hurt for about a day. I was too nervous to put it near my eyes so I can't really say how well it removed my makeup or anything like that. After about two weeks of using this I got huge welts on my face which really hurt. I have never had anything happen like this before! Painful bumps on my face! I stopped using it immediately and it took about two weeks for my skin to fully recover. I talked to the person that had gave me the cleanser and they said that the same thing had happened to them! Overall this product was not worth it, I would sincerely give it 1/10. I was super excited to try it because of the unique scrublet idea, but never again will I use this product.

PLH,
kmatheson