Thursday, June 17, 2010

Review: Essie's Lilacism

I had mentioned this nail polish before in my May favourites entry, but I thought it deserves a full review! I had got this colour in May originally and I was totally obsessed with it but I'm starting to get over my obsession ahaha. This colour applies so smoothly and has an awesome shine to it, one word of warning you really have to make sure that it dries completely otherwise once it gets messed up, it's almost impossible to fix. The colour actually makes me think of spring more than summer but it looks really nice with a little sun kissed skin. My nails were really short this week (as mentioned before) so this colour looked really nice on my nails even though they were so wrecked, you could not tell. I'm super impressed with this one, it stayed on for just about the whole week (only one chip! hooray!) and the only reason that I would change it is just because I got bored of the colour.
It took about 3 coats to get the colour that I wanted.
I would give this about 9/10 I was REALLY impressed with this one. :)

PLH,
kmatheson

Wednesday, June 16, 2010

Celebrity Inspired: Whitney Port


First off for makeup, she's kept it super natural and simple. I did a thick top liquid eyeliner, attempting to mimic what she's done. Then I used a skin tone pigment called "jardin aires" by MAC. Using a loose brush I swept it all along my lid up to my brow. On the crease I used the smallest amount of brown (MAC pigment "Museum Bronze") blend that in with the skin tone colour. Finish off with black mascara, in the picture it doesn't look like she's wearing a lot of mascara but I can't imagine someone not wearing it (haha) so I kept in. For the face I used a lot of bronzer, just because I'm horribly untanned. Then just on the apples of your cheeks use a coral tone blush (I used MAC's ombre blush in "ripe peach"). Complete it with a netural/pink lipgloss. For the hair, (even though I didn't do that portion) I would just do loose curls with a large barrel curling iron only paying attention to the lower half of your hair. (probably about 2" if your hair is long, do down to about 1.5" if not.) Then just run your fingers through the curls and that should do it!
I totally realize that I look way more made up then she does, I just like wearing more makeup, I have horrible lighting/camera and I'm not a professional.


Product information: Watch; asos.com, Dress; janenorman.co.uk, Clutch; asos.com, Bangles; canada.forver21.com, Shoes; dorothyperkins.com, Eyeshadow; smashbox.com.

For the outfit, I tried to get as close as possible! I chose this dress because it's a yellow detailed dress like hers, but I like the different neckline and the bubble shape (as opposed to hers which is just straight which is a hard shape to pull off, kudos to her!). I really like that she paired an ankle bootie (ish) with this dress, it looks so nice and sophosicated I found. I tried to stay within the same colour palette which is why I picked a grey shoe because it picks up on the grey tone that I don't have in the dress that I picked. Her clutch in the photo looks like its orange and silver, I couldn't find a clutch with that so I chose a sweet pink, which kinda lost its colour in the photo :(. Her watch (I assume it's a watch, right wrist) is a pink so I feel the clutch kinda makes up for that. The watch that I chose is Marc by Marc Jacobs (which is a total fantasy, I do realize) I love it so much! :) It's feminine, but plays up the whole 'boyfriend watch" which I've seen a lot of lately, I just adore this watch. Then the bangles are pretty basic again, just chosen to match up hers.

Hope you enjoy!

PLH,
kmatheson

Tuesday, June 15, 2010

Super Simple Nail Art


Once again, these pictures are awful! Within the next couple of weeks, I should have access to a better camera, so please forgive me in the meantime. This was actually a requested topic from a friend, in case you're wondering why I chose to do this.

First off, start with two colours, I chose pink for colour one and purple for colour two. On your left hand paint all your fingers completely except for your pinky. Then paint your pinky finger the second colour and do the opposite on the other hand.
Now you're going to leave your pinky fingers and thumbs one colour, so you want to make sure that you get those all nice and smooth.

On your first finger (closest to your thumb) use the opposite colour and paint the upper diagonal half of your nail.Then your middle finger, you only paint the top half (with the opposite colour). On your ring finger you paint the top diagonal half of your finger. To give you more of an idea of what this is meant to look like; your main colour should make a trapezoid if you put all three fingers together. The first image is the best example of this, but remember that my hands are pointed down.

A couple of things to remember, make sure that the first coat that you do dries completely before you continue on with the design aspect. You may want to choose two polishes that have the same consistency, one of mine was really thick while the other was super thin and it didn't really turn out the way that I wanted it to, it was also hard to remove after wards.
Hopefully you try this!

PLH,
kmatheson

Monday, June 14, 2010

Lemon and Lime

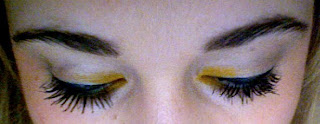
This is another look that I created using my new MAC shadow "goldenrod", this is actually from a couple of weeks ago, but I felt I had a lot of yellow looks on here so I saved it until now. :) Start off by lining the top lash line with a black liquid liner. Then wet a stiff liner brush and use a dark forest green, I used MAC's eyeshadow in "humid". Then line the bottom three quarters of your eye ending right at the outer corner. Then either clean off the brush that you were just using or use another liner brush. Wet the brush again and line the remaining lower lash line with a yellow shadow, I used "goldenrod" (as mentioned above). Carry the colour upwards into the upper inner corner lash line, ending about a quarter of the way. Apply the yellow a little more into the lid so it's not just a liner. Then blend the two colours along the lower lash line where they meet. Using a neutral tone, blend out the yellow on the top lid. Complete the look with some black mascara and you're all set!
PLH,
kmatheson

Sunday, June 13, 2010

How to: Make your hair longer

For the majority of this year I've been trying to go my hair longer and I have picked up a few tricks a long the way! I must say that I have had huge success and I'm quite happy with the results.

Shampoo/Conditioner:
To begin you really need a shampoo that gets rid of dandruff. Now, this isn't assuming that you have dandruff (believe me I don't) but the ingredients in this shampoo will give rid of any bacteria build up that you have in your hair. Bacteria collects at your scalp but by removing it (with the shampoo) this allows your scalp to breathe and your hair to grow longer. I use Head & Shoulders in ocean lift scent just because I feel that it smells less medical. When you shampoo your hair, really massage your scalp because this will work in the shampoo and open up the cuticles of your hair. When conditioning, use warm water to apply and allow it set in for a while. Then rinse your hair with cold water allowing the moisture to sink in, this will make your hair a lot shinier.

Brush:
When your hair is wet use a wide-toothed comb to go through it as this is less harsh then any other type of comb. I got mine at the dollar store, they're super cheap and easy to find. When dry, use a bristle brush this is super soft on your hair and doesn't cause breakage. The worst brush to use on your hair is a metal one as it's common for you rip out hair that is healthy and cause breakage.


Other Care:

Definitely use a heat protector on your hair if you are blow drying, curling or straightening your hair. This product really makes a difference and also keeps fly aways down.
I have also heard that it's better to get your hair trimmed every six weeks but I don't actually follow that just because I am student and that's a difficult thing to work into a budget.

Hopefully this one works for you too!

PLH,
kmatheson


Saturday, June 12, 2010

Go Green!

These past couple of days have been the worst for my nails, so this review may not be totally accurate and I will probably have to revisit this polish with a follow up review.
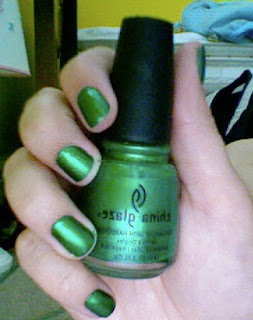
The polishes I used were China Glaze's "Paper Chasing" and Rimmel's 60 second polish in "530 Camouflage". Now I had to use the Rimmel polish as a base because the China Glaze one actually stained my nails yellow the very first time that I had used it :(. On top of staining my nails it made them super weak, now I don't think that this is a trend for China Glaze because I have another bottle in a bright purple and I haven't had any issues with it.
The application of both was fairly easily, I found that CG's polish was a little too thin for my liking so it requires about 3 coats to achieve the look that I wanted. But it has a really nice finishing shine to it which I really liked. This polish took a long time to dry (not the base coat) so again I had a couple marks on it. The polish chipped a lot actually and I had to touch up my nails twice in the span of about three days :(. Again my nails were super bad, so I'm not too sure if it was just a problem with my actual nails or it was the polish. I really do like this look because I feel it's unexpected, I always get so many comments like "ooo green nails, that's daring!" ahaha so I do enjoy doing a colour that's unexpected and would definitely recommend trying a green. Rimmel's polish is awesome on its own but that deserves its own review so I won't include much about it in this one. As far as the China Glaze goes I really like the colour and the finish but I hate that it stains my nails and chips so easily, I'm going to give it a 6/10 just because this time I was really unimpressed with it but I'm a sucker for the finished coat, even if it only stays whole for a day.

Sorry for my super short nail :( it was an accident and I know that's super unappealing but hopefully you get the look of the finished polish!

Are you going to try green?

This picture was taken after 3 days of wear with a couple of touch ups in between.

PLH,
kmatheson

Friday, June 11, 2010

Gold Glitter bomb


This is a really simple, fun look that I put together just cause I really missed my glitter. :) Start off by using a liquid liner along the upper lash line, what ever thickness is up to you. I lined my lower lash line with Bonnebell's eye definer in "smoky" along the waterline. Then I wet my brush and lined the lower lash line with MAC's eyeshadow in "goldmine". I continued with goldmine up on the outer half of my eyelid. Then using MAC's glitter pigment in "reflects gold" I covered my inner half of my eyelid, blending it slightly with goldmine. Then I completed the look with mascara (L'oreal's Voluminous in black). I really like this one, I used it for day time, it could easily be brought to a night time look by putting some dark brown in the crease.

A word of warning! The pigment glitter gets everywhere! It's super difficult to keep it contained, I try just putting a bit in the lid and tapping the excess off, but I still got glitter everywhere. Just be prepared that you may have gold sparkles all over your jeans and hands!

Hope you enjoy this one!

PLH,
kmatheson

Wednesday, June 9, 2010

Nail Polish Review: Sally Hansen's "Hi-Definition Nail Colour"


As promised here is the second review on the other polish that I bought another with the Sally Hansen's Calypso Blue bottle. :)


This is Sally Hansen's "Hi-Definition Nail Colour" in "Three D". This picture was taken about three days after I painted them, sorry about my goblin hand! Hahaha I don't know where my wrist went!
At first I really didn't like this colour, I wasn't so keen on the orange, but I wanted to step out of my comfort zone and go for it. The application was not so great, it was really thin and it took about five coats to get the colour that I wanted. It took a long time to dry so I messed them up a bit in my impatience. :( After every coat I had to wait for it to dry to apply the next one, as you can imagine for five coats that took so long! After a couple days though, the colour really grew on me I started to like it a bit more. It came out with a pinkish tone to it, that you can't really see in the picture but it was really pretty. The tips of my nails also got a lot of wear out of them and started to chip really easily (arrgghh!) so that was annoying.
Overall I would give this nail polish 6.5/10, I think that I still have to get used to it so there may be another review for this nail polish the second time around!

What do you think?

PLH,
kmatheson

Tuesday, June 8, 2010

Purple Shimmery Eyes


I finally took a break from experimenting with my yellow eyeshadow! :) This is a really simple look, truth be told I was in a huge rush this morning trying to get to an exam and doctors appointment, it was quite chaotic! I started with a semi-thick black eyeliner against the top lash line. On the inner quarter I used MAC pigment in "Quietly" as well as in the corner of my eye (towards the nose). In the middle I used a hot pink MAC's "Trophy Pink". On the last third I used another MAC pigment in "Pinked Mauve" which a colour almost right in between hot pink and purple. After all that I blended all three colours together with "Quietly" on the brush blending to just below the brow. On the bottom liner, I used a light brown eyeliner (Bonnebell's "Smoky"). I carried a bit of the pigment down the on the lower inner third of the lash line. Then I completed the look with mascara (L'oreal's Voluminous in Black). I really like this look, it's super easy and can be done in a rush!

I hope you enjoyed this one!

PLH,
kmatheson

Cottage Country!


Product Information: Hat; topman.com, Sunglasses; amazon.com, Shirt; pacsun.com, Sunscreen; drugstore.com, Necklace; modcloth.com, Shorts; tillys.com, Bag; stylefile.com, Nail polish; americanapparel.net, Shoes; tobi.com.

For this look I tried to something a little less girly and a wee bit more rough, I figure the cottage isn't really a place where you can comfortably wear a frilly dress and romp about in the forest. I love this look, it reminds me of campfires, beaches, and Muskoka. One of my favourite pairings for Spring/Summer is long sleeves with shorts, I really like the imbalance of the silhouette. I chose the red striped shirt pairing with a dark wash jean so that it borders on the nautical theme without looking too cheesy. The slouchy hat I love so much, these are super easy to wear and very comfortable. Statement sunglasses I just can't live without, I can't wear sunglasses that are small, I think they look crazy lol most people would think the opposite. Sunscreen is always a must, I just put an SPF 15 up there because apparently there are some new discoveries that sunscreen may not be all too good for you, I think that 15 would be the safest route but definitely do your research and find out! The necklace adds some more flair to the otherwise bland shirt and adds some fancy factor to it. The shoes look so comfy! Love these, you could definitely get so much use out of these :). The overnight I really like, I'm a sucker for nike and this actually a gym bag that I have my eye out for that worked for this look. The nail polish was the best colours that matched that I could find on the site, I don't own any American Apparel polish but I do want to get some so that I can do a review on it! I have tried it and it seems okay, but on some reviews I have read they said that different colours apply differently so I'm going to have to try it for myself.

Are you heading out to the cottage soon?

PLH,
kmatheson

Monday, June 7, 2010

Skin Care Routine

As promised, here is my daily routine for just basic skincare. :)
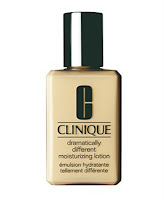
For a facial cleanser I use "Spectro Jel" I usually use the sensitive skin line. It retails for about fifteen bucks, which is pricey so I would suggest waiting for a sale, and it certainly lasts a really long time. This cleanser was recommended to me by a dermatologist, it's definitely the best one that I have ever used. A lot people don't like this one though because it doesn't lather and I have heard other people say that it smells medical? Haha it really works for me because I break out really easily and its mostly for treating acne. Then my next step is using the Spectro Jel cleansing pads, which is basically a toner. It works super well and it's reasonably priced being only about six bucks for a pack of 55. Then finally for a moisturizer I use Clinque's "Dramatically Different Lotion". This moisturizer is one that I will never change, I love it so much! It absorbs really well, moisturizes really well and isn't greasy.
Cleanser:
Cleansing Pads:
Lotion:
Hope this was helpful! Do you have any skincare products that you can't live without?
PLH,
kmatheson

Sunday, June 6, 2010

May Favourites!


Sorry this one is a little late! For my May favourites, I have things that I wouldn't purchase on a monthly basis because they were gifts for my birthday! First I have my new watch, I got this at Nordstorm Rack while I was visiting in Texas and it was quite a steal at only $40! It's Betsey Johnson (one of my favourites) the thing you use to adjust the time is a little rose and the second hand is a heart. :) Super cute and awesome considering that my old watch just stopped.


This is a necklace that I got for my birthday from my Aunt, it has three charms on it one is a tree that says wisdom, another a cupcake that says celebrate and a dragonfly that says friendship. I love this necklace, I wear it practically everyday!

I purchased this nail polish way early in the month because I had wanted a lilac nail polish and originally had my heart set on "Do you lilac it?" by OPI, but the store was sold out and wasn't getting anymore in so I got Essie's "Lilacism" instead. I hadn't tried Essie before and I was slightly disappointed, I think it's meant to be a higher end polish but it came off really chalky and chipped quite often. I do like the colour, the quality to me just wasn't there.

This blush I had to search far and wide to get! This is MAC's blush ombre in "Ripe Peach", it was part of their Spring Forecast collection released in April (I believe). This blush had sold out in all the stores that were closest to me, so I got my mom to pick it up for me from the states. Definitely one of the best makeup purchases I've made to date, it's a really great colour plus you can always just use the orange half or the pink half or combine the two, you can get more than one colour out of this blush :). It was limited edition and I'm not sure if you can find it anymore, but any peach blush would get the same effect.

I also got a CHI flat iron for my birthday and I really love mine! I'm really happy with it, I feel like it's a little less damaging for my hair and it heats up super fast :). I have yet to master the curls with it though, that part is pretty tough.

What were your favourites from this month?

PLH,
kmatheson

Nail Polish Review: Sally Hansen's "Complete Salon Manicure"


On tuesday, I bought this new nail polish; the full brand title of it is Sally Hansen Complete Salon Manicure (I bought it in "Calypso Blue"). As far as I can tell, it's a relatively new line from Sally Hansen and I have to say that I am very impressed! But on with the review;

The application of this polish is spectacular! It's super smooth and I only needed about two coats to get it as bright as I wanted. It didn't bubble at all for me, which I thought was amazing! Considering that this was a drug store purchase, its pretty much a miracle that it didn't bubble. In fact it dried so smoothly that I keep rubbing my fingers over my nails because it had dried so well. :)

I am super rough with my hands and nail polish doesn't usually last for me past about three days without chipping. This nail polish has lasted 6 days so far! There is a little bit of wear on the ends of my nails and one chip on my left middle finger but I could totally survive with it on for another four days. Now, you may think that this isn't a big deal but I get really bothered when I have chips in my nails and my friends always like to say that I paint my nails everyday, when really it's only about three times a week. :)

This picture was taken after six days of wear, so as you can see barely any damage. This also dries really quickly and conditions your nails a wee bit (which I so desperately needed!) I would definitely recommend this 100%, it's one of the best nail polishes that I've tried. The only thing that I would want to change is I wish there were more colours available, it seems that there is only red, pinks and neutrals and that this blue was one of the wilder ones. Although I also did pick up one of the colours in the HD line, so expect a review on that one soon!

What do you think? Any nail polishes that I should try or stay away from?

PLH,
kmatheson

Saturday, June 5, 2010

Mission Complete! Yellow Eyes

Flower Inspired: Simple Yellow Eyes

After waiting so long to finally purchase a yellow eyeshadow, I got it! I brought all my empty containers back to MAC for their recycle program where you bring six empty containers back to the store and you get either a free mascara, eyeshadow, lipstick or gloss! So I chose the colour "goldenrod" and set out on my mission to wear yellow eyeshadow (I believe that I mentioned it in my first post called "bright eyes"). After I lined my eyes along the upper lash line (again with MAC's fluid line). I wet a liner brush and applied the yellow along my lower lash line right to the inner corner. Then on the outer 3/4 of the lid again I applied the yellow, but this time I applied it dry. You can see in the picture, the lower liner is a lot more intense then the lid, which was done intentionally because I wanted a contrast between the dark on the bottom and lighter on the top. The difference happens when you apply any shadow wet or dry, in general the colour will be more intense and stay on longer when you apply it wet. Then on the inner corners I used a colour called "creme soda" by Bare Essentials it's super light and an almost nude colour. I blended to the brow bone but I didn't blend the yellow on the lid because I still wanted it to be bright. :)

I absolutely love this look! Reminds me of marigolds and summer flowers! I hope you enjoyed this one :) More yellow inspired posts to come!

PLH,
kmatheson

Coral/Bronze Eyes

I'm terrible, right now I don't have access to a proper digital camera, but I wanted to upload a look, so I have this terrible photo instead (my apologies). :)
Start off by lining the top lash line with liquid eyeliner, I like to put mine on thick but a thin liner will work too. I use MAC's Fluid Liner in Black track (it comes in a little pot). Then on the outer half of your eyelid use a copper-pink colour, I used "coppering" by MAC. This colour is super bright but don't worry, apply liberally. Then taking a looser brush blend a golden
beige loose powder starting with the inner half of your lid in to blend with the copper. The colour I used is "sunstone" by GOSH cosmetics. Once it's all blended in, carry the colour mid way to your brow so that it looks a little more natural. Line the lower lash line with a light brown, I used "smoky" eye definer by bonnebell, this liner was super cheap and works really well. Then complete the look with mascara on the top and bottom lashes. I used L'oreal's voluminous mascara in black, which again I
bought when it was on sale and it works really well considering I only paid five dollars for it.

Sorry again for the terrible picture!
Did you like this one?

PLH,
kmatheson

Friday, June 4, 2010

Nerds and Bikes

Being as nerdy as I am, I love my bike. Although it's super hard to find stuff that's comfortable to wear biking and still allows you beat the heat. I always wanted a pair of ripped up boyfriend jeans; they seem so comfortable. It's nice to wear loose pants when you're bike riding (leisurely). This loose tank top also does that same job of keeping you comfortable. The shirt says "You're my inspiration" which I thought was really cute. I picked the glasses because they are similar to ones that I own (yes the ones that I have are prescription) and they suited the outfit really well. Rings are the easiest piece of jewelry to wear, though I'm sure that some people will disagree with me. It's easy to add some glam with those rings plus they won't jiggle around when you're riding your bike. Detailed sandals are easy to wear definitely suitable for the bike too. The messenger bag is the best idea for traveling, the clutch that I chose is meant to go within the messenger bag, I liked how it matched the shape of the heart within the shirt. Anyways, a nerdy outfit to go with my nerdy love for my bike.

Product Information: Glasses; asos.com, Top; forever21.com, Jeans; republic.co.uk, Apple Ring; missselfridge.com, Three-Finger Ring; urbanoutfitters.com, Heart Bag; usc.co.uk, Messenger Bag; amazon.com, Shoes; shopruche.com, Bike; econsciousmarket.com

How much do you love your bike? :)

PLH,
kmatheson

Florals and Blue Nail Polish

Product information: Dress; misselfridge.com, Ring; girlprops.com, Clutch; topshop.com, Necklace; amazon.com, Shoes; amazon.com, Nail Polish; nailpolishdiva.com.

I love floral. Hahaha, I will admit it. While looking for the that perfect floral dress, I was thinking about where i would wear it and what not. I thought a wedding would be the best thing for it! A lot of my friends are going to weddings this summer (so jealous!) so I thought I would put a look together for it. :)

This dress is one that I have been looking for forever! I really want to get a strapless fitted floral dress, this is the closet one that I could find to my vision. Those green shoes! Just love them! I think that they may be a little too high for that short of a dress, but any dark green shoes would just be lovely for this. Just in case you were wondering, those shoes are Steve Madden (definitely one of my favourite brands). The necklace is really cute and spunky, a nice touch I thought. The nail polish is one that I have been wanting for so long now! I just love it! I still have yet to purchase it! It's "What's with the Cattitude" by OPI. It's part of the Shrek Forever After edition, (inspired by puss in boots I'm assuming.) It's such a sweet baby blue, definitely needs to be part of my collection. The ring also plays up on the blue colour I feel, putting all the blue hues together making it more subtle. You wouldn't really notice the blue until someone got a glimpse of your stunning hand :). The clutch is super cute and neutral, you could use this for anything really. I've seen a lot of woven bags lately, I'm really liking it, reminds me of a basket. :)
Let me the know, do you like this outfit? What are your feelings on floral? :)

PLH,
kmatheson

Thursday, June 3, 2010

You know, I learned something today!


A very valuable lesson indeed! I've been struggling with my hair lately, trying so hard to grow it and not to get too many haircuts (to save money really). Anyways, many people that know me know that I have wavy/curly hair but I flat iron it everyday (so bad, I know.) lately with the crazy thunderstorms here my curls have been sprouting out the sides of my hair no matter what I do! So I've come up with a solution. Knowing that my hair is just going to be horrendous by the end of the day, I've just given in to let my hair go curly.

Once I towel dry my hair I put the smallest amount of mousse in it and it shake in my hair, not scrunching it! That way it doesn't get too curly and looks more wavy and relaxed. Sometimes from there I just let it go, but it sticks to my face because of all the humidity. From there, I just put a bun on the top of my head pulling back all bangs and fly aways. I love buns on the top of girl's heads, it looks so elegant. Also, a nerdy detail, I personally think it makes me look taller, which is always a bonus for me. :) I usually secure it with a headband just to make it look a little more polished.

Do you have any ideas of how I can battle the rain/humidity?

PLH
kmatheson

Wednesday, June 2, 2010

My Foundation Routine


I feel that I have a pretty different foundation routine then most just because I don't use liquid foundation. That's right, I'm a mineral powder foundation girl. I've seen/read so many reviews on foundations but not a ton of positive ones on mineral foundation so I'll tell you my story. (By the way, this was a requested topic from a friend!) I've had problem skin since I can remember (tragic, right?) it was only until recently that my skin started to clear due to a strict routine (which I will fully review later) the combination of liquid foundation never seemed to do it for me. I tried the "Bare Minerals" foundation starting up kit and it worked really well for me as well as clearing up my skin. I wasn't entirely happy with it though because once you ran out of the primer, the foundation wouldn't cover as well and that was super annoying. As a student I really don't have the extra twenty bucks laying around to dish out for primer, so I found another solution. After washing and moisturizing, I apply MAC's concealer select cover-up (in NW20) around the eyes, right from the lower lash line down to the top of my cheekbone and then on the lid. Then I cover up problem areas or any areas that are slightly discoloured, for me that's usually my T-zone and chin.
After that I apply Clinique's "Super balanced powder foundation SPF 15" all over my face and neck with a full coverage brush. Then after that I lightly put bronzer on my face paying special attention to the cheek bones. The bronzer that I'm really loving right now is Physician's Formula bamboo one, it's got a nice gold tint to it. Then I do blush along the cheekbones, I love bright orange and pink ones especially for summer, I think that it looks quite fresh. The one that I'm reaching for lately is MAC's blush ombre in "Ripe Peach" but it was special edition, so I don't think that you can find that one around anymore (my apologies!). After blending in the blush, I finish up with a finishing powder lightly dusting it all over my face. I usually use one that has a bit of glitter in it, but you can get lots that don't have a shimmer if that's what you prefer. From there I do my eye make-up and hair set for the day.
I do find that the mineral foundation does make a difference for my skin, and I would definitely recommend it to everyone. I don't think that I will ever go back to liquid foundation, but I suppose never say never!
Let me know what you think, was this review helpful at all? What are your thoughts on mineral makeup?

PLH,
kmatheson

Bright Eyes


One of the biggest trends that I have noticed lately is bright eyeshadow. I don't really feel like this is a new thing for me, I've always worn bright eyeshadows but I was so happy to see that they are now so widely available. I'm a big fan of teal colours along the bottom lash line (also used as a eyeliner) it's probably the easiest way to get into bright eyeshadows. I definitely recommend using MAC's eyeshadow in "Humid", I purchased it last year and I've gotten a lot of use out of it. Applying it wet ensures that it will last all day and makes the colour really pop.


I saw a lot of bright blue eyeshadows as a main colour on the eyes, but I'm not a fan! I have to say that when I see blue thats too bright, I'm reminded of Mimi from the Drew Carrey Show. Lol, totally not a look that you would want to sport! (Hopefully ;) ) For main colours I think that pinks and purples work best, it doesn't seem too "in your face" and looks really girly and feminine. It also reminds me of fairy tales almost, not too sure why, but whenever I look at certain purples I always think of unicorns and fairies!
One look that I'm dying to try is bright yellow eye makeup! I'm saving my pennies to get a yellow eyeshadow, as I threw mine out about six months ago (How silly!) Something like the image below;


I find a big part of what I like to do with my makeup, is be creative. As I had mentioned before with the unicorns and what not, I definitely have more fun when I think of a concept before I start applying, mind you that doesn't happen everyday! I do like to repeat certain looks, and for sure I will upload some pictures later on as this blog matures. :)

Let me know what do you like to draw from for inspiration or do you stick with a daily routine?

PLH,
kmatheson